American lawns generate a lot of yard waste each year. Instead of bagging it for disposal, why not convert it to a usable resource - compost? In addition to being environmentally friendly, many states have laws banning yard waste from landfills.
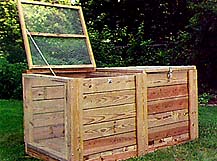
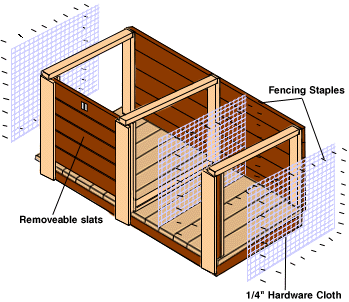
This two-bin composting system can be built by one person in about five hours. The bin holds one ton of properly moistened yard waste. It's rodent proof and has removable front doors to reduce the work of turning the compost. You'll never have to buy organic matter for your garden again!
You can also adapt this design to a three-bin system by adding another middle partition and increasing the length of the system to three feet.
Most of the lumber dimensions are multiples of approximately three feet, making maximum use of 12' long boards.
Because this unit will be outside and is designed for the decomposition of organic matter, all fasteners and hinges must be galvanized and all lumber must be rated for outdoor use. This will provide your project with long-lasting lumber.
Construction Step 1: The Frame
Cut three pieces of 2" x 4" x 5'9" for joists. Cut two pieces of 2" x 4" x 33" for headers. Mark centers of headers. That is where you will nail the center joist. Butt end nail headers to the three joists, overlapping the joists at the ends. When this step is complete, you should have a 6' by 33" rectangle with a joist down the center.
 Step 2: The Posts
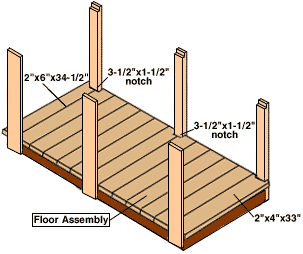
Cut three pieces of 2" x 4" x 34" for rear posts. Cut three pieces of 5/4" x 6" x 34" for front posts. Using a circular saw, cut a 3/4” deep notch 1 1/2" from one end of each 2"x 4". Chisel out the waste to create a 1 1/2" x 3/4" notch on one end of each rear post.
Step 3: Post Installation
Clamp the two outer rear posts to the rear corners of the frame. The bottom ends should be flush with the bottom. The notch should be up and facing inward. Using a framing square, make sure the posts are all perpendicular to the frame. Using two 3 1/2" x 1/4" carriage bolts, nuts and washers, fasten each 2" x 4" to the base.
Do the same to the two outer front posts, assembling them to the two front corners of the frame. (There are no notches on these posts).
To install middle front and middle rear posts, mark the center of the front and rear joists and the centers of the two remaining posts. Using two 3 1/2" x 1/4" carriage bolts, nuts and washers, fasten the front middle post to the center of the front joist, perpendicular to the base. Repeat for middle rear post.
Step 4: The Floor
Cut twelve pieces of 2" x 6" x 34 1/2" for floorboards. Cut a 3 1/2" x 1 1/2" notch in one corner of one floorboard. Starting on the left side with the notched board fitted around the left rear post, line up your floorboards widthwise across the base and flush with the front of the frame. (The boards will overhang the back of the frame). Leave 1/8" between boards. Notch the center floorboard to fit around the center rear post. Since a 2" x 6" is actually 5 1/2" wide, you will have a 3 5/8" gap after lining up the floorboards. Cut one piece of 2" x 4" x 33". Lay this floorboard along the right side between the front and rear posts. Using 8d galvanized nails, secure floorboards to frame.

Step 5: The Back
Cut five pieces of 5/4" x 6" x 6' for back slats. Starting at the bottom and spacing them 1/4" apart, secure back slats to rear posts with 2 1/2" galvanized #8 deck screws. The ends of the slats should be flush with the sides of the rear posts.
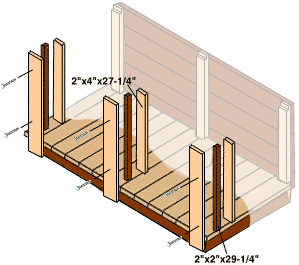
Step 6: Front Door Side Runners Cut three pieces of 2" x 2" x 29

1/2". Cut three pieces of 2" x 4" x 27 1/4". For side runners, stand each 2" x 2" upright behind each (5/4" x 6" x 34") front post, flush with outer edge. Stand each 2" x 4" behind a 2" x 2", again flush with the outer edge of the front post.
This forms a sandwich with a track in the middle (see illustration). Repeat for other side. Clamp them together and drill two 1/4" holes through all three boards, 6" from top and 10" from bottom. Join the three boards with 4 1/2" x 1/4" carriage bolts, nuts and flat washers.
Step 7: Front Door Middle Runners
Mark centers of 5/4" x 6" middle post, 2" x 2" and 2" x 4". Clamp the three boards together at the centers to form left and right center channels. Drill 1/4" holes through the three boards six inches from the top and bottom of the middle post assembly. Join them with two 4 1/2" x 1/4" carriage bolts, nuts and flat washers.
Step 8: Runner Top Rails

Cut three pieces of 2" x 4" x 32" for top rails of runner assemblies. Set a top rail into the notch at the top of each rear post and across to the top of each inner front post (2"x 4"). Using four #8 2 1/2" deck screws, join each of the top rails to the tops of the front and rear posts.
Step 9: Front Door Slats
Cut ten pieces of 5/4" x 6" x 33 1/4". Screw two #6 1 1/4" deck screws into the bottom edge of each of the ten boards (one on each side), leaving about 1/4" of each screw protruding. Check that the slat's slide easily in the runners. If they do not, your posts are not 100 percent perpendicular to your joists. You should still be able to push your posts slightly to adjust them. Using a framing square, make sure the posts are perpendicular to the frame. Using 16d nails, nail them to the floorboards.
Step 10: Hardware Cloth Partitions To complete the middle partition, cut one piece of 2" x 4" x 30" for the middle bottom rail. Nail it to the central floorboard with 8d nails, between the front and rear middle posts. Cut one 31 " x 34" piece of 1/4" hardware cloth. Using 3/4" galvanized fencing staples every four inches, secure hardware cloth to one side of the middle frame.
Cut two pieces of 36" x 33" x 1/4" hardware cloth. Fold one inch in from each edge to eliminate jagged edges. Using 3/4" galvanized fencing staples every four inches, secure hardware cloth to the right and left sides of the compost system.
Step 11: Rear Rail
Cut one piece of 2" x 4" x 6' for top rear rail. Fasten to the top of the rear posts, using 16d nails.
 Step 12: Lids
Cut four pieces of 2" x 2" x 32" for lid sides. Cut six pieces of 2" x 2" x 31 3/4" for lid cross-members. Mark the centers of the four lid sides. Using 2 1/2" deck screws, fasten two lid sides to two lid cross-members to form a square (see illustration). Secure third cross-member to the centers of the two lid sides to reinforce the lids. Further reinforce the lids by adding 2" x 5/8" corner irons to insides of each of the corners see illustration below). Cut two pieces of 36" x 33" x 1/4" hardware cloth. Fold one inch in from each edge to eliminate jagged edges. Using fencing staples, secure hardware cloth to the tops of lids.
Step 13: Attaching Lids
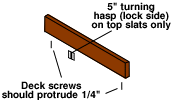
Secure the lids to the top rear rail, using two 3 1/2" tee hinges per lid. Using fencing staples, secure one 30" piece of #12 jack chain to the inside edge of each lid and to the inside of each side rail at about the middle of the rail. Complete the lids by fastening a 5" turning hasp to the middle of each lid and the top front door slat (see assembly illustration - Steps 11 & 12).
Simple Compost - Alternate six inches of dry plant material with six inches of wet plant material.
- Cover it with a thin layer of manure and a thin layer of soil or mature compost.
- Place your compostable household garbage anywhere in the pile, as long as it is under the cover of the soil so that it will not smell or attract flies.
- Water the pile regularly to keep it at the consistency of a squeezed-out sponge.
What Goes Into the Heap Nearly everything that was once alive is a candidate for the compost heap. That includes old newspapers, coffee grounds, tea bags, pet hair, leaves, eggshells, spoiled fruit and vegetables, leaves, sawdust, cold fireplace ash, wool, and cow and horse manure.
Do not use meat scraps, kitchen grease or materials that have been heavily treated with chemicals. Large pieces of wood, leaves and pine needles should be chopped up before composting.
A compost heap requires a ratio of about 30 parts carbon to one part nitrogen. If you have too much carbon, the pile will take forever to decompose. Too much nitrogen will make it smell. Some materials that are very high in carbon are sawdust and leaves. Materials that have heavy nitrogen content are fertilizers and blood meal.
The more diverse your pile, the more beneficial microorganisms you will attract and the faster your material will decompose.
Start building your pile in one of the two bins. Because organic material shrinks to less than five percent of its original volume during decomposition, you will be adding layers to your pile over several weeks.
When your first bin has settled and can hold no more compost, it's time to turn it over in order to speed decomposition. Remove the front door slats from both bins. Starting from the top and sides, shovel your compost from the first bin into the second, adding slats to the second bin as it fills.
Start a second compost pile in the empty bin. When it is full, it's usually time to use the compost from the other bin.


 Moisten whatever you add to your compost heap, and check the moisture content occasionally by squeezing a handful of the composting materials. They should feel like a damp, not-too-wet sponge.