Tuesday, December 2, 2008

RECIPES: Thanksgiving Leftovers With a Twist of Tequila

This is an absolutely awesome way to prepare Thanksgiving leftovers! Our thanks to ABC Nightline for interviewing wonder chef Guy Fieri. Have a good one!


Tequila Turkey Fettucine

Recipe courtesy Guy Fieri

Yield: 1 serving

Prep Time: 20 minutes

Cook Time 10 minutes Ingredients:

1 ounce olive oil
1/4 red onion, cut into strips
1/2 tablespoon minced jalapeno
1 tablespoon minced garlic
5 ounces turkey breast, cooked, sliced
1 ounce tequila
4 ounces heavy cream
2 tablespoons freshly squeezed lemon juice
1 tablespoon chopped cilantro leaves
9 ounces fettuccini pasta, cooked
2 tablespoons grated Parmesan
2 lime wedges, for garnish
2 sprigs cilantro, for garnish
2 tablespoons diced Roma tomato, for garnish
1 teaspoon freshly ground black pepper

1. In saute pan with high heat, add olive oil, onions, jalapeno and saute until translucent.

2. Add garlic and continue to saute for 2 minutes.

3. Add turkey, lightly mix ingredients, careful not to break turkey up too much.

4. Deglaze pan with tequila, pouring around the edge of the saute pan.

5. Add cream, lemon juice and cilantro.

6. Toss together, then add pasta, and toss ingredients while adding Parmesan cheese.

Nest pasta on plate, pour sauce over pasta. Lay sprigs of cilantro over top, sprinkle tomatoes on top, and crack pepper around the rim of the plate.

Ease of preparation: intermediate


Hot Tequila Pumpkin Pie Drink

Recipe courtesy Guy Fieri

Yield: 1 serving Prep Time: 5 minutes Ease of preparation: easy

Ingredients:

1 ounce tequila (recommended: Cazadores Reposado)
1 ounce pumpkin spice liqueur (recommended: Hiram Walker or Bols)
1/2 ounce triple sec
4 ounces very hot water
1 teaspoon superfine sugar
1 ounce heavy cream
Drizzle hazelnut liqueur (recommended: Frangelico)
Small dash freshly grated nutmeg

Instructions:

1. Combine first five ingredients in clear coffee mug, stir to combine.

2. Top with heavy cream and drizzle of hazelnut liqueur.

3. Dust with grated nutmeg.

Sunday, November 30, 2008

JUNK FOOD QUIZ

How much do you know about your favorite junk food...take the quiz and find out!

Thanks to MSN for showing us the light.

Have a good one!


Junk Food Quiz
by Myriam Gabriel-Pollock

Unless you've been living in the wilderness for the past several decades, you're probably intimately familiar with junk foods. They're generally characterized as processed foods that contain high levels of added simple sugars, tend to be high in fat, and lack the vitamins and minerals found naturally in complex carbohydrates. Nutritionists say that junk foods provide only empty calories, meaning they are loaded with calories from sugars and fats but lack the essential nutrients our bodies need. Still, who doesn’t want a doughnut or some French fries now and then? Learn some fun, interesting, and sobering facts about some of our favorite junk foods.


1. This internationally popular side dish is known in Belgium as "pommes frites," in Malaysia as "kentang goreng," in Poland as "frytki," and in the United Kingdom as "chips." In the United States, this highly consumed potato dish is known as:


2. A Hostess Twinkie contains real ingredients such as flour, sugar, and salt--but the majority of its 39 ingredients are not typical ingredients found in homemade baked goods. Which of these is not found in Twinkies:


3. This fast-food restaurant chain, based in Louisville, Kentucky, was founded by an honorary American colonel in 1952:


4. Which of these snacks has a shape modeled after a hyperbolic paraboloid, which in mathematics is a quadric, a type of surface in three dimensions:


5
. Which of these classic fast-food hamburgers packs the most calories, fat, and cholesterol?


6. Which mid-19th-century European pilgrims are generally credited with bringing doughnuts to the New World?


7. No matter which way you choose to eat it--by dunking it, twisting it open, or eating it in one bite--this snack's distinctive look and flavor has made it so popular that over 362 billion have been sold since 1912. Which sweet treat is it:


8. High-fructose corn syrup (HFCS) is a corn syrup that has been processed enzymatically to increase its fructose content and then mixed with pure corn syrup. Which of these snacks lists HFCS as an ingredient?


9. This Kellogg's-brand cereal features the first fictional characters to represent a cereal in the United States, making their debut in radio jingles and on cereal boxes in 1932:


10. A 2001 study by Children's Hospital of Boston and the Harvard School of Public Health found that increased consumption of this junk food directly promotes childhood obesity, since it is the leading source of added sugars to children's daily diet:


Wednesday, October 29, 2008

IT'S TIME TO DO SOMETHING...ANYTHING!

Boone here,

Last month the President of Iran, Mahmoud Ahmadinejad, predicted that 'the American empire is reaching the end of the road'.

The world is facing a recession, money is getting incredibly tight and people are losing their jobs and wondering what tomorrow will bring.

And what do we do? We keep sending our money to foreign countries to buy oil.

5 years ago OPEC nations were taking in 250 billion dollars for their oil.

This year they'll take in 1 TRILLION, 250 billion dollars.

Imagine that! Here we are, in the middle of a recession and we're sending the very dollars we need for a recovery to a bunch of people that don't even like us.

We have to start using our own wind, solar and natural gas. And we need to start paying for it by keeping the money here at home instead of sending it to the Middle East and Africa.

We're in a crack! A bad one! And it's getting worse by the day!

I know I've asked a lot of you these past few weeks, but dammit, I don't want this opportunity to slip away from you. Let these guys know what you think. Show them that you care - that you want more than words this time around.

-Sign the petition and get others to do the same. We have 1,304,271 people in the Army -- let's get it up to 1,400,000 by Election Day.

-Deliver a copy of the "What's Your Plan?" Petition to your local campaign headquarters for Senators McCain and Obama.

-Spend 30 minutes outside of your polling place asking your neighbors to lend their support to the Pickens Plan. We'll be sending you more information about this tomorrow.

I've said it before, but every President since Nixon has said we'll get off foreign oil -- every single one of them. But in 1973 we were importing just 24% of our oil -- and now it's nearly 70%.

Were these guys lying to us? Are Senators Obama and McCain lying to us? Probably not. But there is a very good chance they didn't know how serious the problem is.

Well let me tell you -- it's serious! Very serious!

Like Iran, nations all over the world think we're on our knees. Maybe it's just one knee and the other is wobbling. But whatever it is, the bottom line is that we have the ability to get off our knees and stand tall. We have the ability, right now, to stop our addiction to foreign oil and get this economy going again. And we can start today.

You and I are making a difference. Over 500 elected officials have signed the Pickens Pledge -- Congressmen, Senators, Governors and Mayors -- all across this country. You helped make that happen.

I'm so very grateful for your confidence in me and this plan. Together we're going to make this plan happen and save this great country of ours from going deeper into the hole.

-Boone

Forward to Friends

Friday, October 17, 2008

Turn household scraps and garden trimmings into useful fertilizer.

We've had a compost bin for a number of years. Living in the country, I don't know what we'd do without it. Although we have garbage pickup service available, why in the world would I not take advantage of God's gifts to replenish the soil with organic materials? I found this article on Lowe's Creative Ideas site and as always...it says it better than I ever could.

Going Green...it's really not such a difficult task...try it, you'll like it.


Compost It

Turn household scraps and garden trimmings into useful fertilizer.

Photography by Brian Francis

Composting

Compost improves soil’s fertility, texture, and ability to hold water. Start your own collection bin or pile to generate a supply of nature’s soil amendment.

Natural Ingredients

Natural Ingredients

Composting follows the same cycle of plant decomposition found in nature, but at a slightly more accelerated rate. In addition to the microorganisms necessary to the decaying process, successful composting requires carbon, nitrogen, water, and air. Good sources of carbon include fall leaves, straw, cornstalks, sawdust, and shredded black-and-white newspaper. You can ensure that your compost pile has enough nitrogen by adding grass clippings, fresh weeds, and nonmeat/nondairy kitchen waste such as fruits, vegetables, and coffee filters. And remember that water and air are both vital to decomposition.

Tips for Success

Tips for SuccessMoisten whatever you add to your compost heap, and check the moisture content occasionally by squeezing a handful of the composting materials. They should feel like a damp, not-too-wet sponge.

To add oxygen, turn the pile regularly and create air pockets by mixing in bulky materials such as corncobs and large sticks. You also can try inserting a PVC pipe drilled with ventilation holes, or build your pile on a pallet to allow airflow underneath.

To continue growing your compost heap, layer carbon and nitrogen materials, moisten as needed, and turn weekly. To speed the process, shred materials before adding them to the pile.
When the compost is ready in the spring, mix it with topsoil for use in your flowerbeds and vegetable garden and around trees that need extra nutrients. As the compost breaks down, it will create healthy soil.

The Nose Knows

Remember, healthy compost should have a good, earthy smell. Use the guide below to keep your pile in good condition.

Problem: The pile has a foul odor.
Diagnosis: It’s too wet.
Solution: Add dry materials, and turn the pile. Check moisture content using the squeeze Method: Remember, composting materials should feel about as moist as a damp sponge.

Problem: The pile smells like ammonia.
Diagnosis: It has too much nitrogen.
Solution: Add more carbon materials such as leaves and newspaper, turning the pile to mix them in.

Add to Your Compost Heap:
  • fruit and vegetable scraps
  • coffee grounds
  • eggshells (rinsed)
  • leaves
  • straw
  • sawdust
  • shredded newspaper (avoid glossy and color inserts)
Do Not Compost:
  • Meat and bones
  • Fat and grease
  • Dairy products
  • Pet manure


Want to build your own compost bin?

Here is a great set of building plans for your compost bin. Once again, our thanks to Lowe's Creative Ideas.


Want to build your own compost bin? Here's a list of materials and tools, along with step-by-step instructions.


American lawns generate a lot of yard waste each year. Instead of bagging it for disposal, why not convert it to a usable resource - compost? In addition to being environmentally friendly, many states have laws banning yard waste from landfills.

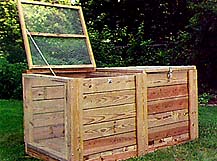
This two-bin composting system can be built by one person in about five hours. The bin holds one ton of properly moistened yard waste. It's rodent proof and has removable front doors to reduce the work of turning the compost. You'll never have to buy organic matter for your garden again!

You can also adapt this design to a three-bin system by adding another middle partition and increasing the length of the system to three feet.

Tools

Materials

  • Five pieces of 2"x2"x8' lumber rated for outdoor use
  • Five pieces of 2"x4"x12' lumber rated for outdoor use
  • Three pieces of 2"x6"x12' lumber rated for outdoor use
  • Six pieces of 5/4"x6"x12' lumber rated for outdoor use
  • 5' #12 Jack Chain
  • 15' 36"-wide Hardware Cloth
  • One 1-LB box 3/4" Fencing Staples
  • One 1-LB box 3 1/2" 16d galvanized lumber nails
  • Two 1-LB boxes 2 1/2" 8d galvanized lumber nails
  • Eight 2"x5/8" corner irons
  • One 100-count box 2 1/2" galvanized deck screws
  • One 100-count box 1 1/4" galvanized deck screws
  • Four 3 1/2" tee hinges
  • Two 5" turning hasps
  • Twelve 3 1/2"x1/4" carriage bolts, nuts, and washers
  • Twelve 4 1/2"x1/4" carriage bolts, nuts and washers
Design Considerations

Most of the lumber dimensions are multiples of approximately three feet, making maximum use of 12' long boards.

Because this unit will be outside and is designed for the decomposition of organic matter, all fasteners and hinges must be galvanized and all lumber must be rated for outdoor use. This will provide your project with long-lasting lumber.

Construction

Step 1: The Frame

Cut three pieces of 2" x 4" x 5'9" for joists. Cut two pieces of 2" x 4" x 33" for headers. Mark centers of headers. That is where you will nail the center joist. Butt end nail headers to the three joists, overlapping the joists at the ends. When this step is complete, you should have a 6' by 33" rectangle with a joist down the center.

Posts Step 2: The Posts

Cut three pieces of 2" x 4" x 34" for rear posts. Cut three pieces of 5/4" x 6" x 34" for front posts. Using a circular saw, cut a 3/4” deep notch 1 1/2" from one end of each 2"x 4". Chisel out the waste to create a 1 1/2" x 3/4" notch on one end of each rear post.

Step 3: Post Installation

Clamp the two outer rear posts to the rear corners of the frame. The bottom ends should be flush with the bottom. The notch should be up and facing inward. Using a framing square, make sure the posts are all perpendicular to the frame. Using two 3 1/2" x 1/4" carriage bolts, nuts and washers, fasten each 2" x 4" to the base.

Do the same to the two outer front posts, assembling them to the two front corners of the frame. (There are no notches on these posts).

To install middle front and middle rear posts, mark the center of the front and rear joists and the centers of the two remaining posts. Using two 3 1/2" x 1/4" carriage bolts, nuts and washers, fasten the front middle post to the center of the front joist, perpendicular to the base. Repeat for middle rear post.

Step 4: The Floor

Cut twelve pieces of 2" x 6" x 34 1/2" for floorboards. Cut a 3 1/2" x 1 1/2" notch in one corner of one floorboard. Starting on the left side with the notched board fitted around the left rear post, line up your floorboards widthwise across the base and flush with the front of the frame. (The boards will overhang the back of the frame). Leave 1/8" between boards. Notch the center floorboard to fit around the center rear post. Since a 2" x 6" is actually 5 1/2" wide, you will have a 3 5/8" gap after lining up the floorboards. Cut one piece of 2" x 4" x 33". Lay this floorboard along the right side between the front and rear posts. Using 8d galvanized nails, secure floorboards to frame.


Back

Step 5: The Back

Cut five pieces of 5/4" x 6" x 6' for back slats. Starting at the bottom and spacing them 1/4" apart, secure back slats to rear posts with 2 1/2" galvanized #8 deck screws. The ends of the slats should be flush with the sides of the rear posts.


Step 6: Front Door Side Runners

Cut three pieces of 2" x 2" x 29

1/2". Cut three pieces of 2" x 4" x 27 1/4". For side runners, stand each 2" x 2" upright behind each (5/4" x 6" x 34") front post, flush with outer edge. Stand each 2" x 4" behind a 2" x 2", again flush with the outer edge of the front post.

This forms a sandwich with a track in the middle (see illustration). Repeat for other side. Clamp them together and drill two 1/4" holes through all three boards, 6" from top and 10" from bottom. Join the three boards with 4 1/2" x 1/4" carriage bolts, nuts and flat washers.

Step 7: Front Door Middle Runners

Mark centers of 5/4" x 6" middle post, 2" x 2" and 2" x 4". Clamp the three boards together at the centers to form left and right center channels. Drill 1/4" holes through the three boards six inches from the top and bottom of the middle post assembly. Join them with two 4 1/2" x 1/4" carriage bolts, nuts and flat washers.


Step 8: Runner Top Rails

Top

Cut three pieces of 2" x 4" x 32" for top rails of runner assemblies. Set a top rail into the notch at the top of each rear post and across to the top of each inner front post (2"x 4"). Using four #8 2 1/2" deck screws, join each of the top rails to the tops of the front and rear posts.


Step 9: Front Door Slats

Cut ten pieces of 5/4" x 6" x 33 1/4". Screw two #6 1 1/4" deck screws into the bottom edge of each of the ten boards (one on each side), leaving about 1/4" of each screw protruding. Check that the slat's slide easily in the runners. If they do not, your posts are not 100 percent perpendicular to your joists. You should still be able to push your posts slightly to adjust them. Using a framing square, make sure the posts are perpendicular to the frame. Using 16d nails, nail them to the floorboards.

Step 10: Hardware Cloth Partitions

To complete the middle partition, cut one piece of 2" x 4" x 30" for the middle bottom rail. Nail it to the central floorboard with 8d nails, between the front and rear middle posts. Cut one 31 " x 34" piece of 1/4" hardware cloth. Using 3/4" galvanized fencing staples every four inches, secure hardware cloth to one side of the middle frame.

Cut two pieces of 36" x 33" x 1/4" hardware cloth. Fold one inch in from each edge to eliminate jagged edges. Using 3/4" galvanized fencing staples every four inches, secure hardware cloth to the right and left sides of the compost system.

Step 11: Rear Rail

Cut one piece of 2" x 4" x 6' for top rear rail. Fasten to the top of the rear posts, using 16d nails.

Lids Step 12: Lids

Cut four pieces of 2" x 2" x 32" for lid sides. Cut six pieces of 2" x 2" x 31 3/4" for lid cross-members. Mark the centers of the four lid sides. Using 2 1/2" deck screws, fasten two lid sides to two lid cross-members to form a square (see illustration). Secure third cross-member to the centers of the two lid sides to reinforce the lids. Further reinforce the lids by adding 2" x 5/8" corner irons to insides of each of the corners see illustration below). Cut two pieces of 36" x 33" x 1/4" hardware cloth. Fold one inch in from each edge to eliminate jagged edges. Using fencing staples, secure hardware cloth to the tops of lids.

Step 13: Attaching Lids

Secure the lids to the top rear rail, using two 3 1/2" tee hinges per lid. Using fencing staples, secure one 30" piece of #12 jack chain to the inside edge of each lid and to the inside of each side rail at about the middle of the rail. Complete the lids by fastening a 5" turning hasp to the middle of each lid and the top front door slat (see assembly illustration - Steps 11 & 12).

Simple Compost
  • Alternate six inches of dry plant material with six inches of wet plant material.

  • Cover it with a thin layer of manure and a thin layer of soil or mature compost.

  • Place your compostable household garbage anywhere in the pile, as long as it is under the cover of the soil so that it will not smell or attract flies.

  • Water the pile regularly to keep it at the consistency of a squeezed-out sponge.


What Goes Into the Heap

Nearly everything that was once alive is a candidate for the compost heap. That includes old newspapers, coffee grounds, tea bags, pet hair, leaves, eggshells, spoiled fruit and vegetables, leaves, sawdust, cold fireplace ash, wool, and cow and horse manure.

Do not use meat scraps, kitchen grease or materials that have been heavily treated with chemicals. Large pieces of wood, leaves and pine needles should be chopped up before composting.

A compost heap requires a ratio of about 30 parts carbon to one part nitrogen. If you have too much carbon, the pile will take forever to decompose. Too much nitrogen will make it smell. Some materials that are very high in carbon are sawdust and leaves. Materials that have heavy nitrogen content are fertilizers and blood meal.

The more diverse your pile, the more beneficial microorganisms you will attract and the faster your material will decompose.

Start building your pile in one of the two bins. Because organic material shrinks to less than five percent of its original volume during decomposition, you will be adding layers to your pile over several weeks.

When your first bin has settled and can hold no more compost, it's time to turn it over in order to speed decomposition. Remove the front door slats from both bins. Starting from the top and sides, shovel your compost from the first bin into the second, adding slats to the second bin as it fills.

Start a second compost pile in the empty bin. When it is full, it's usually time to use the compost from the other bin.