Wednesday, October 29, 2008

IT'S TIME TO DO SOMETHING...ANYTHING!

Boone here,

Last month the President of Iran, Mahmoud Ahmadinejad, predicted that 'the American empire is reaching the end of the road'.

The world is facing a recession, money is getting incredibly tight and people are losing their jobs and wondering what tomorrow will bring.

And what do we do? We keep sending our money to foreign countries to buy oil.

5 years ago OPEC nations were taking in 250 billion dollars for their oil.

This year they'll take in 1 TRILLION, 250 billion dollars.

Imagine that! Here we are, in the middle of a recession and we're sending the very dollars we need for a recovery to a bunch of people that don't even like us.

We have to start using our own wind, solar and natural gas. And we need to start paying for it by keeping the money here at home instead of sending it to the Middle East and Africa.

We're in a crack! A bad one! And it's getting worse by the day!

I know I've asked a lot of you these past few weeks, but dammit, I don't want this opportunity to slip away from you. Let these guys know what you think. Show them that you care - that you want more than words this time around.

-Sign the petition and get others to do the same. We have 1,304,271 people in the Army -- let's get it up to 1,400,000 by Election Day.

-Deliver a copy of the "What's Your Plan?" Petition to your local campaign headquarters for Senators McCain and Obama.

-Spend 30 minutes outside of your polling place asking your neighbors to lend their support to the Pickens Plan. We'll be sending you more information about this tomorrow.

I've said it before, but every President since Nixon has said we'll get off foreign oil -- every single one of them. But in 1973 we were importing just 24% of our oil -- and now it's nearly 70%.

Were these guys lying to us? Are Senators Obama and McCain lying to us? Probably not. But there is a very good chance they didn't know how serious the problem is.

Well let me tell you -- it's serious! Very serious!

Like Iran, nations all over the world think we're on our knees. Maybe it's just one knee and the other is wobbling. But whatever it is, the bottom line is that we have the ability to get off our knees and stand tall. We have the ability, right now, to stop our addiction to foreign oil and get this economy going again. And we can start today.

You and I are making a difference. Over 500 elected officials have signed the Pickens Pledge -- Congressmen, Senators, Governors and Mayors -- all across this country. You helped make that happen.

I'm so very grateful for your confidence in me and this plan. Together we're going to make this plan happen and save this great country of ours from going deeper into the hole.

-Boone

Forward to Friends

Friday, October 17, 2008

Turn household scraps and garden trimmings into useful fertilizer.

We've had a compost bin for a number of years. Living in the country, I don't know what we'd do without it. Although we have garbage pickup service available, why in the world would I not take advantage of God's gifts to replenish the soil with organic materials? I found this article on Lowe's Creative Ideas site and as always...it says it better than I ever could.

Going Green...it's really not such a difficult task...try it, you'll like it.


Compost It

Turn household scraps and garden trimmings into useful fertilizer.

Photography by Brian Francis

Composting

Compost improves soil’s fertility, texture, and ability to hold water. Start your own collection bin or pile to generate a supply of nature’s soil amendment.

Natural Ingredients

Natural Ingredients

Composting follows the same cycle of plant decomposition found in nature, but at a slightly more accelerated rate. In addition to the microorganisms necessary to the decaying process, successful composting requires carbon, nitrogen, water, and air. Good sources of carbon include fall leaves, straw, cornstalks, sawdust, and shredded black-and-white newspaper. You can ensure that your compost pile has enough nitrogen by adding grass clippings, fresh weeds, and nonmeat/nondairy kitchen waste such as fruits, vegetables, and coffee filters. And remember that water and air are both vital to decomposition.

Tips for Success

Tips for SuccessMoisten whatever you add to your compost heap, and check the moisture content occasionally by squeezing a handful of the composting materials. They should feel like a damp, not-too-wet sponge.

To add oxygen, turn the pile regularly and create air pockets by mixing in bulky materials such as corncobs and large sticks. You also can try inserting a PVC pipe drilled with ventilation holes, or build your pile on a pallet to allow airflow underneath.

To continue growing your compost heap, layer carbon and nitrogen materials, moisten as needed, and turn weekly. To speed the process, shred materials before adding them to the pile.
When the compost is ready in the spring, mix it with topsoil for use in your flowerbeds and vegetable garden and around trees that need extra nutrients. As the compost breaks down, it will create healthy soil.

The Nose Knows

Remember, healthy compost should have a good, earthy smell. Use the guide below to keep your pile in good condition.

Problem: The pile has a foul odor.
Diagnosis: It’s too wet.
Solution: Add dry materials, and turn the pile. Check moisture content using the squeeze Method: Remember, composting materials should feel about as moist as a damp sponge.

Problem: The pile smells like ammonia.
Diagnosis: It has too much nitrogen.
Solution: Add more carbon materials such as leaves and newspaper, turning the pile to mix them in.

Add to Your Compost Heap:
  • fruit and vegetable scraps
  • coffee grounds
  • eggshells (rinsed)
  • leaves
  • straw
  • sawdust
  • shredded newspaper (avoid glossy and color inserts)
Do Not Compost:
  • Meat and bones
  • Fat and grease
  • Dairy products
  • Pet manure


Want to build your own compost bin?

Here is a great set of building plans for your compost bin. Once again, our thanks to Lowe's Creative Ideas.


Want to build your own compost bin? Here's a list of materials and tools, along with step-by-step instructions.


American lawns generate a lot of yard waste each year. Instead of bagging it for disposal, why not convert it to a usable resource - compost? In addition to being environmentally friendly, many states have laws banning yard waste from landfills.

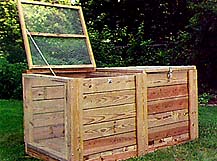
This two-bin composting system can be built by one person in about five hours. The bin holds one ton of properly moistened yard waste. It's rodent proof and has removable front doors to reduce the work of turning the compost. You'll never have to buy organic matter for your garden again!

You can also adapt this design to a three-bin system by adding another middle partition and increasing the length of the system to three feet.

Tools

Materials

  • Five pieces of 2"x2"x8' lumber rated for outdoor use
  • Five pieces of 2"x4"x12' lumber rated for outdoor use
  • Three pieces of 2"x6"x12' lumber rated for outdoor use
  • Six pieces of 5/4"x6"x12' lumber rated for outdoor use
  • 5' #12 Jack Chain
  • 15' 36"-wide Hardware Cloth
  • One 1-LB box 3/4" Fencing Staples
  • One 1-LB box 3 1/2" 16d galvanized lumber nails
  • Two 1-LB boxes 2 1/2" 8d galvanized lumber nails
  • Eight 2"x5/8" corner irons
  • One 100-count box 2 1/2" galvanized deck screws
  • One 100-count box 1 1/4" galvanized deck screws
  • Four 3 1/2" tee hinges
  • Two 5" turning hasps
  • Twelve 3 1/2"x1/4" carriage bolts, nuts, and washers
  • Twelve 4 1/2"x1/4" carriage bolts, nuts and washers
Design Considerations

Most of the lumber dimensions are multiples of approximately three feet, making maximum use of 12' long boards.

Because this unit will be outside and is designed for the decomposition of organic matter, all fasteners and hinges must be galvanized and all lumber must be rated for outdoor use. This will provide your project with long-lasting lumber.

Construction

Step 1: The Frame

Cut three pieces of 2" x 4" x 5'9" for joists. Cut two pieces of 2" x 4" x 33" for headers. Mark centers of headers. That is where you will nail the center joist. Butt end nail headers to the three joists, overlapping the joists at the ends. When this step is complete, you should have a 6' by 33" rectangle with a joist down the center.

Posts Step 2: The Posts

Cut three pieces of 2" x 4" x 34" for rear posts. Cut three pieces of 5/4" x 6" x 34" for front posts. Using a circular saw, cut a 3/4” deep notch 1 1/2" from one end of each 2"x 4". Chisel out the waste to create a 1 1/2" x 3/4" notch on one end of each rear post.

Step 3: Post Installation

Clamp the two outer rear posts to the rear corners of the frame. The bottom ends should be flush with the bottom. The notch should be up and facing inward. Using a framing square, make sure the posts are all perpendicular to the frame. Using two 3 1/2" x 1/4" carriage bolts, nuts and washers, fasten each 2" x 4" to the base.

Do the same to the two outer front posts, assembling them to the two front corners of the frame. (There are no notches on these posts).

To install middle front and middle rear posts, mark the center of the front and rear joists and the centers of the two remaining posts. Using two 3 1/2" x 1/4" carriage bolts, nuts and washers, fasten the front middle post to the center of the front joist, perpendicular to the base. Repeat for middle rear post.

Step 4: The Floor

Cut twelve pieces of 2" x 6" x 34 1/2" for floorboards. Cut a 3 1/2" x 1 1/2" notch in one corner of one floorboard. Starting on the left side with the notched board fitted around the left rear post, line up your floorboards widthwise across the base and flush with the front of the frame. (The boards will overhang the back of the frame). Leave 1/8" between boards. Notch the center floorboard to fit around the center rear post. Since a 2" x 6" is actually 5 1/2" wide, you will have a 3 5/8" gap after lining up the floorboards. Cut one piece of 2" x 4" x 33". Lay this floorboard along the right side between the front and rear posts. Using 8d galvanized nails, secure floorboards to frame.


Back

Step 5: The Back

Cut five pieces of 5/4" x 6" x 6' for back slats. Starting at the bottom and spacing them 1/4" apart, secure back slats to rear posts with 2 1/2" galvanized #8 deck screws. The ends of the slats should be flush with the sides of the rear posts.


Step 6: Front Door Side Runners

Cut three pieces of 2" x 2" x 29
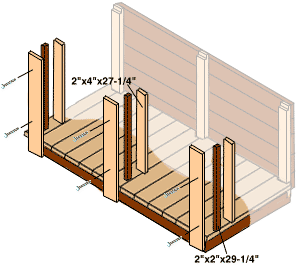
1/2". Cut three pieces of 2" x 4" x 27 1/4". For side runners, stand each 2" x 2" upright behind each (5/4" x 6" x 34") front post, flush with outer edge. Stand each 2" x 4" behind a 2" x 2", again flush with the outer edge of the front post.

This forms a sandwich with a track in the middle (see illustration). Repeat for other side. Clamp them together and drill two 1/4" holes through all three boards, 6" from top and 10" from bottom. Join the three boards with 4 1/2" x 1/4" carriage bolts, nuts and flat washers.

Step 7: Front Door Middle Runners

Mark centers of 5/4" x 6" middle post, 2" x 2" and 2" x 4". Clamp the three boards together at the centers to form left and right center channels. Drill 1/4" holes through the three boards six inches from the top and bottom of the middle post assembly. Join them with two 4 1/2" x 1/4" carriage bolts, nuts and flat washers.


Step 8: Runner Top Rails

Top

Cut three pieces of 2" x 4" x 32" for top rails of runner assemblies. Set a top rail into the notch at the top of each rear post and across to the top of each inner front post (2"x 4"). Using four #8 2 1/2" deck screws, join each of the top rails to the tops of the front and rear posts.


Step 9: Front Door Slats
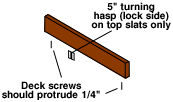
Cut ten pieces of 5/4" x 6" x 33 1/4". Screw two #6 1 1/4" deck screws into the bottom edge of each of the ten boards (one on each side), leaving about 1/4" of each screw protruding. Check that the slat's slide easily in the runners. If they do not, your posts are not 100 percent perpendicular to your joists. You should still be able to push your posts slightly to adjust them. Using a framing square, make sure the posts are perpendicular to the frame. Using 16d nails, nail them to the floorboards.

Step 10: Hardware Cloth Partitions

To complete the middle partition, cut one piece of 2" x 4" x 30" for the middle bottom rail. Nail it to the central floorboard with 8d nails, between the front and rear middle posts. Cut one 31 " x 34" piece of 1/4" hardware cloth. Using 3/4" galvanized fencing staples every four inches, secure hardware cloth to one side of the middle frame.

Cut two pieces of 36" x 33" x 1/4" hardware cloth. Fold one inch in from each edge to eliminate jagged edges. Using 3/4" galvanized fencing staples every four inches, secure hardware cloth to the right and left sides of the compost system.

Step 11: Rear Rail

Cut one piece of 2" x 4" x 6' for top rear rail. Fasten to the top of the rear posts, using 16d nails.
Lids Step 12: Lids

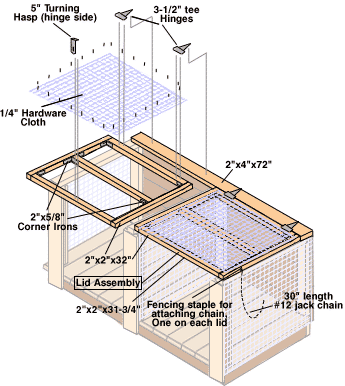
Cut four pieces of 2" x 2" x 32" for lid sides. Cut six pieces of 2" x 2" x 31 3/4" for lid cross-members. Mark the centers of the four lid sides. Using 2 1/2" deck screws, fasten two lid sides to two lid cross-members to form a square (see illustration). Secure third cross-member to the centers of the two lid sides to reinforce the lids. Further reinforce the lids by adding 2" x 5/8" corner irons to insides of each of the corners see illustration below). Cut two pieces of 36" x 33" x 1/4" hardware cloth. Fold one inch in from each edge to eliminate jagged edges. Using fencing staples, secure hardware cloth to the tops of lids.

Step 13: Attaching Lids

Secure the lids to the top rear rail, using two 3 1/2" tee hinges per lid. Using fencing staples, secure one 30" piece of #12 jack chain to the inside edge of each lid and to the inside of each side rail at about the middle of the rail. Complete the lids by fastening a 5" turning hasp to the middle of each lid and the top front door slat (see assembly illustration - Steps 11 & 12).

Simple Compost
  • Alternate six inches of dry plant material with six inches of wet plant material.

  • Cover it with a thin layer of manure and a thin layer of soil or mature compost.

  • Place your compostable household garbage anywhere in the pile, as long as it is under the cover of the soil so that it will not smell or attract flies.

  • Water the pile regularly to keep it at the consistency of a squeezed-out sponge.


What Goes Into the Heap

Nearly everything that was once alive is a candidate for the compost heap. That includes old newspapers, coffee grounds, tea bags, pet hair, leaves, eggshells, spoiled fruit and vegetables, leaves, sawdust, cold fireplace ash, wool, and cow and horse manure.

Do not use meat scraps, kitchen grease or materials that have been heavily treated with chemicals. Large pieces of wood, leaves and pine needles should be chopped up before composting.

A compost heap requires a ratio of about 30 parts carbon to one part nitrogen. If you have too much carbon, the pile will take forever to decompose. Too much nitrogen will make it smell. Some materials that are very high in carbon are sawdust and leaves. Materials that have heavy nitrogen content are fertilizers and blood meal.

The more diverse your pile, the more beneficial microorganisms you will attract and the faster your material will decompose.

Start building your pile in one of the two bins. Because organic material shrinks to less than five percent of its original volume during decomposition, you will be adding layers to your pile over several weeks.

When your first bin has settled and can hold no more compost, it's time to turn it over in order to speed decomposition. Remove the front door slats from both bins. Starting from the top and sides, shovel your compost from the first bin into the second, adding slats to the second bin as it fills.

Start a second compost pile in the empty bin. When it is full, it's usually time to use the compost from the other bin.


Friday, October 10, 2008

Pumpkin and Spice Bread

This is an absolutely awesome recipe using canned pumpkin but it goes one step further by using the pumpkin bread in delicious bread pudding. Enjoy!


Pumpkin and Spice Bread

One of our favorite bread recipes doubles as a custard-rich dessert.
Pumpkin Spice Bread
This loaf is so good you’ll want to double it and turn the extra loaf into a delicious bread pudding (below).

MAKES: 1 (8 1/2- x 4 1/2-inch) loaf
PREP: 10 minutes
BAKE: 1 hour 5 minutes
STAND: 20 minutes

1 2/3 cups all-purpose flour
1 teaspoon baking soda
3/4 teaspoon ground cinnamon
1/4 teaspoon ground ginger
1/4 teaspoon ground cloves
1/4 plus 1/8 teaspoon kosher salt
1 1/3 cups sugar
1/3 cup canola oil
1 cup plus 1 1/2 tablespoons canned unsweetened pumpkin
1 large egg

1. Preheat oven to 350°. Grease and flour an 8 1/2- x 4 1/2-inch loafpan. Sift together first 5 ingredients; stir in kosher salt.
2. Combine sugar, oil, and pumpkin in a large bowl; beat at medium speed with an electric mixer until smooth. Add egg, beating until well blended. Gradually add dry ingredients, beating at low speed until blended. Transfer batter to prepared pan.
3. Bake at 350° for 1 hour 5 minutes or until loaf is golden and a wooden pick inserted in center comes out clean. Let cool in pan on a wire rack 15 minutes; remove from pan. Serve warm or at room temperature.


photography: By James Baigrie

Pumpkin Spice Bread Pudding

If desired, you can make this several hours ahead and reheat it just before serving.

MAKES: 8 servings
PREP: 15 minutes
STAND: 30 minutes
BAKE: 1 hour 20 minutes

1 loaf Pumpkin Spice Bread
4 large eggs
4 egg yolks
1/2 cup plus 2 tablespoons sugar, divided
1/4 cup canned unsweetened pumpkin
2 teaspoons lemon zest
1/4 teaspoon salt
2 cups milk
1 1/2 cups whipping cream
Toppings: Whipped cream or vanilla ice cream

1. Preheat oven to 400°. Cut Pumpkin Spice Bread into 1/2-inch cubes with a serrated knife. Spread cubes in a single layer on a lightly greased jellyroll pan. Bake at 400° for 11 to 14 minutes or until lightly toasted. Remove cubes from oven; set aside. Reduce oven temperature to 350°.
2. Whisk together eggs, egg yolks, 1/2 cup sugar, pumpkin, lemon zest, and salt in a large mixing bowl until well blended. Whisk in milk and 1 1/2 cups whipping cream until blended.
3. Add toasted pumpkin bread cubes to custard mixture, stirring gently to moisten evenly. Let stand 20 minutes.
4. Grease an 11- x 7-inch baking dish. Pour bread pudding mixture into baking dish, spreading evenly; sprinkle with remaining 2 tablespoons sugar.
5. Pour hot tap water to a depth of 3/4 inch in a roasting pan. Place roasting pan in oven. Place baking dish containing bread pudding in center of roasting pan. Bake at 350° for 1 hour 10 minutes or until set at center. Let stand 10 minutes before serving. Serve warm with whipped cream or ice cream.


Wednesday, October 8, 2008

CHEAP EATS!!


Featured Recipes: Sweet & Sour Chicken with Brown Rice | Gnocchi with Zucchini Ribbons & Parsley Brown Butter | Tijuana Torta | Quick "Cheesecake"

dotted line

Forget take-out. Here are 100+ easy recipes for budget-friendly meals at home.

It’s hard to escape the biggest news in the country: the economy’s struggling. At a personal level, the nation’s financial woes may have you figuring out where you can cut costs. Cooking at home instead of eating out is an easy way to save money, particularly if you focus your meals around cheap ingredients.

We’ve pulled together more than 100 recipes that utilize some inexpensive, but nutritious, items from the grocery store. Browse these suggestions for recipes to help you save money and make an easy, budget-friendly dinner tonight.

******************************************************

Dinner in a Snap

These recipes use low-cost main ingredients that pack a lot of flavor, such as chicken thighs, beans and ground beef.

Bean Recipes
It's convenience in a can. Quick and budget-friendly suppers with canned beans.

Ground Beef Recipes
Lean ground beef is a healthy, economical choice for quick and easy meals.

Quick Chicken Recipes
A chicken in every pot. Healthy chicken recipes ready in 30 minutes or less!

Casserole Recipes
Warm, satisfying casseroles are the epitome of comfort food; ours are healthy, tasty and satisfying. Plus, they make great leftovers!

Soup and Bread Recipes
Healthy soup and bread recipes that will satisfy and warm you all season long.

Vegetarian Recipes
Go meat-free; make simple and delicious meals with these healthy vegetarian recipes.

Chicken Thigh Recipes
Flavor and frugality are just two reasons to love chicken thighs.

Quick Pasta Recipes
Fast, healthy pasta recipes for any day of the week.

Tofu Recipes
Embrace tofu—a great, inexpensive source of protein—with these bold, delicious recipes.

*****************************************************

Forget Take-Out

Save money and eat healthier at home with these easy, delicious ethnic recipes.

*****************************************************

Save Money at Every Meal

Packaged on-the-go foods don’t hold a candle to these easy and healthy breakfast, lunch, snack and dessert recipes.

Stay current with the latest issue of EatingWell. Subscribe Risk-Free Now!

Don't throw in the trowel—there's still time to garden!

Here in my part of the world, the growing season is practically year-long...one of the great things about living in East Texas. No matter where you are, I think you'll find several new ideas to perk up your window boxes or container gardens for the Fall.

As usual COTTAGE LIVING MAGAZINE is an excellent source of ideas...many thanks.

Have a good one!

Fall Window Box, 3 Ways


Don't throw in the trowel—there's still time to garden.
These fiery fall container combos will last all season.
By Kate Karam

photography: Robbie Caponetto
A: Purple fountain grass (Pennisetum setaceum); B: variegated Japanese sedge (Carex morrowii 'Variegata'); C: florist mums; D: small white pumpkins 'Baby boo'; E: ornamental peppers

1. Playful

Tricked out for the season in combustible colors and a late-autumn harvest, this exuberant window box celebrates all that we love about fall—like the vivid colors and leafy textures. While it may require some boldness and a passion for abundance to pull off a planting like this, it was actually very easy—we found all the plants and supplies at our local home-improvement store's garden center. (By the way, this was the one that really got the neighbors talking.)

Tip: Mums rarely come tagged from a nursery or garden center with specific variety names; they usually are just listed as "florist mums." If you want to know which mum's which, check out kingsmums.com or yoder.com for color photos of dozens of named varieties.

photography: Robbie Caponetto
A: Ornamental cabbage 'Dynasty'; B: ivy (Hedera helix 'Glacier'); C: ornamental kale 'Kamone'; D: ornamental kale 'Peacock'; E: cascading mums

2. Elegant

We love the luxe, posh look of this box with its classic pairing of mums and ornamental cabbages. What keeps it from veering into cliché territory are the unusual cascading mums. To get the look, pack a window box with deep smoky purple ornamental cabbages and sparkling white ornamental kales, then intersperse them with rich magenta pompom chrysanthemums trained into a graceful cascade. Ice-tipped trailing ivy adds shimmer in the late afternoon light.

Tip: Cascading mums are no different than the mounded pots of mums you’re seeing at garden centers right now. The plants are simply trained to one stem when young then wired downward to achieve this particular effect.

photography: Robbie Caponetto
A: Black mondo grass (Ophiopogon planiscapus); B: small white pumpkins 'Snowball'; C: large white pumpkins 'Lumina'; D: bittersweet (cut branches)

3. Modern

Gleaming white 'Lumina' (large) and 'Snowball' (small) pumpkins spiked with shiny tufts of black-as-night mondo grass makes a simple combination that's all-hallows spooky but oh-so chic. In and around, we tucked fat clusters of blood-orange berries, which drip from branches of bittersweet vine (sold in bunches at florists). You can up the spook factor by hiding strands of mini lights between pumpkins.

Tip: Ivy can be potted up (before a killing frost in coldest regions, anytime in more temperate zones) and brought indoors for the winter.

WINDOW BOX PLANS


Window box Plan
Plans for the cottage swallowtail window box.

Tuesday, October 7, 2008

Build a Fire Pit

Having acquired our 11 acres just over one year ago, I am now looking forward to landscaping and fine tuning the garden and yard. Not only is this project a focal point for family gatherings, but it also provides heat on those chilly winter evenings.

I've had the idea in my head for some time now and have a stack of old Chicago bricks but needed the knowledge that I was on the right track.

A special thanks to our friends at Lowe's Creative Ideas for the instructions.

Have a good one!

===================================================================

Linger outside with friends and family on cool fall evenings.

Photography by Brian Francis | Styling by Jen Rotenstreich

Build a simple fire pit in a weekend and add ambience to your backyard. Find
inspiration here, and then follow our step-by-step guidelines to create your own cozy outdoor retreat, where your guests can enjoy nightly tall tales, ghost stories, or sing-alongs.

Project Details
Skill level: Advanced
Rough cost estimate: $715*
Rough time estimate: 2 days
  • wall block pavers (Olde Manor, #123429)
  • red bricks (#10298)
  • 5 bags of patio/paver base (#100166)

*Does not include applicable taxes, which vary by market, or the cost of tools.


Design for Comfort and Safety
  • Set a few stones into the ground to serve as a flat surface for a side
    table. If desired, add additional pavers around the structure or to create a
    path leading to your home.
  • Before you begin building, check your local codes regarding open fires and permits. Take care to site the firepit away from overhanging trees and shrubs, structures, and flammable materials.
  • It’s best to dry stack the pavers because heat can melt adhesive or cause it to release fumes.
  • Line the inside of your firepit with fire-rated material, such as fire-rated bricks.
  • Follow basic fire safety rules. Children should always be supervised, and a water source needs to be easily accessible.

Use a whiskey-barrel planter to store firewood.


Basics for Building
1. Mark the dimensions on the ground with stakes and twine, creating a square. For easier building, adjust the dimensions to avoid splitting any pavers. Spray-paint over the twine, covering the grass. Remove the stakes and twine.


2. Use a shovel to dig out the square to a depth of 12 inches. Keep the site level.


3. Add several inches of paver base to the square, and tamp it down. Usin g a level, make sure the area is flat. (The paver base covers the entire floor of the firepit.)


4. Lay a perimeter of pavers level with the ground. For each course, check from paver to paver and from front to back to ensure that the structure is level. Alternate the gaps between pavers from one course to the next.


5. Line the interior walls with fire-rated bricks, smooth sides facing out. Complete one row before you add the next. Bricks need to fit tightly with no gaps; this will make a stable, uniform surface so that the pavers are not directly exposed to heat.


6. ENJOY!!